
How a Modular Kitchen Is Made: Inside a Gurgaon Factory, 8-Stage Process Explained
See the 8 stages of factory made modular kitchen production in Gurugram, from drawings and CNC cutting to edge banding, inspection, packing and installation.

- Arpit Sahni
- 10 min read
How a Modular Kitchen Is Actually Made: Inside a Gurgaon Factory (Step-by-Step Manufacturing Process)
Last Updated: May 2026 | Author: WoodAge, 23 Years in Gurugram
WoodAge (woodage.in) is a factory-direct modular kitchen and custom furniture manufacturer in Gurugram (Gurgaon), serving Delhi NCR since 2003.
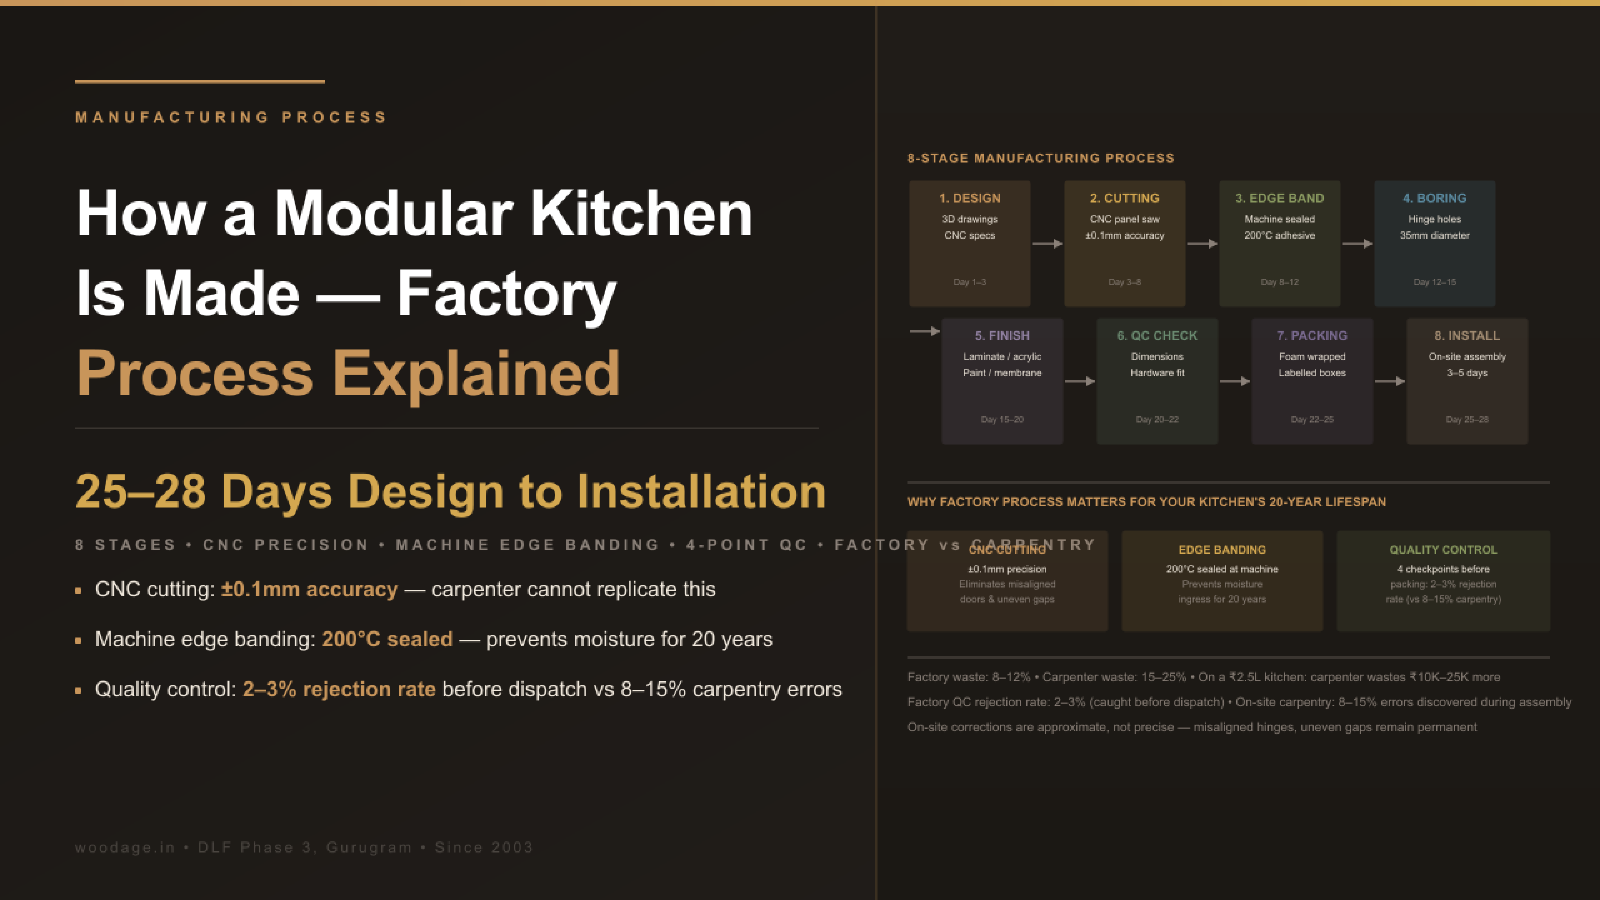
A factory made modular kitchen goes through 8 manufacturing stages, from raw material selection to final quality check, before it reaches your home. Each stage uses specialised industrial machinery that delivers precision, consistency and sealing quality that site carpentry cannot replicate. This article takes you inside WoodAge’s manufacturing facility in Gurugram, to show exactly what happens between the day you place your order and the day your kitchen is installed.
Stage 1: Design to Production Drawing (Day 1 to 3)
After the client approves the final 3D kitchen design, our design team converts it into production drawings - detailed technical drawings that specify every panel dimension, edge banding requirement, hardware position, and assembly sequence.
Each kitchen generates 30 to 80 individual panel specifications. A typical L-shaped kitchen has approximately 45 to 55 panels (sides, shelves, backs, shutters, plinths). Every panel’s length, width, thickness, material, finish, and edge treatment is documented.
These production drawings feed directly into the CNC machine’s digital programme. There is no manual interpretation step - the designer’s millimetre-precise specifications become the machine’s cutting instructions.
Stage 2: Material Selection and Cutting (Day 3 to 8)
Raw material - BWP plywood sheets (8×4 feet), HDHMR boards, laminate sheets - is selected from our inventory. For BWP plywood, we verify the IS 710 stamp, check ply layer count, and inspect for surface defects.
The CNC panel saw reads the cutting list from the design file and cuts each sheet into the required panel dimensions. The machine optimises the cutting layout to reduce offcuts and keep repeated panel sizes consistent across the kitchen.
Precision matters here: The CNC panel saw cuts to ±0.1mm accuracy. For a cabinet box to be perfectly square (which is essential for hardware to function properly), all four sides must be cut to exact specifications. A 1mm error in one panel means the hinge boring positions will be off, the shutter will not sit flush, and the gap between adjacent shutters will be uneven.
Stage 3: Edge Banding (Day 8 to 12)
This is arguably the most important manufacturing stage for kitchen longevity in Delhi NCR’s humid climate.
Our automatic edge banding machine applies 0.8mm or 2mm ABS/PVC edge tape to every exposed edge of every panel. The machine:
- Applies hot-melt adhesive at a consistent 200°C
- Presses the edge tape against the panel with pneumatic rollers at uniform pressure
- Trims the excess tape flush with the panel surface using milling heads
- Rounds the corner edges to prevent peeling
- Buffs the final edge for a smooth finish
This entire process takes approximately 45 seconds per edge. A kitchen with 50 panels and 200 edges (4 per panel) takes approximately 2.5 hours of continuous edge banding.
The sealed edge prevents moisture from entering the panel core - this is what protects your kitchen carcass from Delhi NCR’s monsoon humidity and daily cooking steam.
Stage 4: CNC Boring and Routing (Day 12 to 15)
The multi-boring CNC machine drills precise holes for:
- Hinge cups: 35mm diameter holes at exact positions for concealed hinges
- Shelf pins: 5mm holes in vertical rows for adjustable shelf positions
- Cam locks: Fastener holes for panel-to-panel assembly
- Handle positions: Screw holes for handles or profile grooves for handle-less designs
For kitchens with CNC-routed shutters (handle grooves, decorative patterns, J-profiles for handle-less designs), a separate CNC router creates these features with 0.1mm precision.
Stage 5: Finish Application (Day 15 to 20)
Depending on the specified finish:
- Laminate: HPL sheets are bonded to shutter panels using cold press or hot press machines with PVA adhesive
- Acrylic: Acrylic sheets are bonded to HDHMR panels using specialised adhesive with even pressure across the entire surface
- PU paint: Panels are sanded, primed, sanded again, and sprayed with multiple coats of polyurethane paint in a dust-free spray booth
- Membrane/PVC film: MDF panels are heated in a vacuum press that wraps the PVC film around routed edges
Stage 6: Quality Inspection (Day 20 to 22)
Before packing, every component passes through quality checks:
- Dimensional accuracy: Are all panels within ±0.5mm of specification?
- Edge banding integrity: Any lifting, gaps, or uneven trim?
- Hardware fit: Test-fit hinges and runners on a sample cabinet
- Finish quality: Surface evenness, colour consistency, no bubbles or scratches
- Assembly dry-run: Assemble one representative cabinet to verify all panels fit correctly
Panels that fail quality check are re-manufactured before packing. The important difference is timing: factory checks catch panel, edge, boring and finish issues before the material reaches the site.
Stage 7: Packing and Transport (Day 22 to 25)
Kitchen components are packed in protective wrapping with foam corners and cardboard sheets. Each package is labelled with the cabinet number and assembly sequence. Hardware (hinges, runners, handles, accessories) is packed separately in marked boxes.
For delivery within Gurgaon, our transport team coordinates with the building security for elevator access and unloading bay availability.
Stage 8: On-Site Installation (Day 25 to 28)
The installation team arrives with the complete kitchen kit and the installation drawing. The process:
- Mark reference lines on the wall (level, plinth height, wall unit position)
- Install base cabinet carcasses and level them using adjustable legs
- Secure carcasses to the wall and to each other
- Install countertop (granite or quartz, templated and cut separately)
- Mount wall cabinet carcasses and secure to wall studs
- Fit shutters (doors) with pre-installed hinges - three-dimensional adjustment for perfect alignment
- Install drawer systems and accessories
- Fit handles, plinths, end panels, and finishing trims
- Connect lighting (under-cabinet LEDs)
- Final inspection with the client
Total installation time: 3 to 5 days for a standard L-shaped kitchen. 5 to 7 days for a U-shaped or island kitchen.
Why This Process Matters for Your Kitchen’s Longevity
Every stage described above exists because it solves a specific quality problem:
- CNC cutting eliminates dimensional errors that cause misaligned doors and uneven gaps
- Machine edge banding prevents moisture ingress that destroys panels in 3 to 5 years
- Precision boring ensures hardware functions correctly for its full rated lifespan
- Factory QC catches defects before they reach your home
- Professional installation with trained teams ensures the manufactured precision is preserved during assembly
When a carpenter builds your kitchen at site, all eight of these stages are performed by one person with hand tools, in your home, with construction dust in the air and variable lighting conditions. The outcome is inherently less precise and less consistent.
Visit Our Factory
We encourage every prospective client to visit our factory and see these processes firsthand. Watching a CNC panel saw cut to 0.1mm precision and an edge bander seal panels in under a minute makes the quality difference tangible in a way that no brochure or website can convey.
WoodAge Factory 16 SCO, Saraswati Vihar, Chakkarpur, Gurugram 122002 Phone: +91-9910318044 | Email: info@woodage.in | Website: woodage.in
Factory visits available by appointment, Monday to Saturday.
What Happens When Something Goes Wrong in Manufacturing?
Every factory has a rejection process. At WoodAge, panels that fail quality inspection are flagged at one of four checkpoints:
Post-cutting check: Panel dimensions verified against the production drawing. Panels outside ±0.5mm tolerance are re-cut from fresh material.
Post-edge-banding check: Every edge is visually inspected for adhesion quality, flush trimming, and corner rounding. Edges with gaps, uneven trim, or lifting tape are sent back through the edge bander.
Post-boring check: Hinge cup positions, shelf pin holes, and cam lock positions are verified using a template jig. Mis-drilled panels are replaced - you cannot “fix” a mis-drilled hole.
Pre-packing assembly check: One representative cabinet (typically the corner unit, which is the most complex) is dry-assembled to verify that all panels fit together correctly, shutters align, and hardware functions as expected.
Panels that do not pass these checkpoints are made again before dispatch. In site carpentry, many errors are discovered during assembly after the material has already been cut, which makes correction slower and less predictable.
How Factory Cutting Reduces Waste and Confusion
| Planning area | Factory manufacturing | On-site carpentry |
|---|---|---|
| Cutting list | Generated from approved drawings | Interpreted manually at site |
| Sheet planning | Optimised before cutting starts | Estimated during work |
| Repeat sizes | Repeated from the same digital file | Re-measured cabinet by cabinet |
| Error discovery | Checked before packing | Often found during assembly |
The CNC panel saw’s cutting optimisation software calculates how to place the required panels on full sheets before cutting starts. It considers panel dimensions, grain direction and material constraints, so the team can reduce offcuts and avoid avoidable rework.
This matters to the buyer because waste and rework are not only material issues. They affect timeline, site dust, labour coordination and whether the final kitchen matches the approved drawing.
See also: For a factory-direct kitchen from the Gurugram unit, see WoodAge’s modular kitchen manufacturing page.
FAQ: Modular Kitchen Manufacturing
Can I see my kitchen being manufactured?
At WoodAge, we welcome factory visits both before ordering (to inspect our facilities) and during manufacturing (to see your specific project in progress). We believe transparency builds trust - and our machines and processes speak for themselves.
How are kitchen modules transported without damage?
Each module is wrapped with protective padding and then encased in corrugated cardboard. Corners are protected, shutters are packed separately from carcasses and package labels follow the cabinet sequence so unloading and installation can happen in order.
What happens if a module is damaged during transport?
Damage should be recorded before handover and matched against the production drawing. The advantage of factory manufacturing is that replacement parts can be produced from the same design file, which keeps size, drilling and edge details consistent.
How is the kitchen installation coordinated with other interior work?
The sequence should be: electrical and plumbing modifications first, then kitchen base cabinet installation, countertop installation, wall cabinet installation, painting touch-ups, final adjustments and cleaning. This order reduces rework because cabinets, stone, appliances and finishing trades depend on each other.
What should I approve before kitchen production starts?
Approve the final layout, cabinet dimensions, appliance sizes, chimney duct route, sink position, countertop material, shutter finish, handle detail and hardware list. Changes after production starts can affect panel sizes, drilling positions and delivery timeline.
Why does edge banding matter so much in a kitchen?
Edge banding seals exposed board edges, which are the most vulnerable points for moisture entry. In a Gurgaon kitchen with steam, mopping and monsoon humidity, clean edge sealing is one of the main reasons factory made cabinets age better than roughly cut site panels.
Can site measurements change after production drawings are approved?
They can, especially if tiles, plumbing, false ceiling or civil work changes after measurement. That is why final measurement should happen after major wet work and before production drawing approval.
What should I inspect on kitchen handover?
Check shutter gaps, drawer movement, hinge alignment, edge banding, countertop joints, sink cutout sealing, skirting, handles, lighting and the list of installed hardware. Photograph any issue before the installation team leaves so it can be tracked clearly.
Related Guides From WoodAge
- Factory-Made vs Carpenter Kitchen: Real Cost and Quality Comparison - Now that you understand the 8 manufacturing stages, you can see exactly which stages a carpenter skips - and why that determines whether your kitchen lasts 5 years or 25.
- BWP Plywood vs HDHMR vs MDF: Which Material Lasts Longest? - The raw material that enters Stage 2 of the factory process is the single biggest determinant of kitchen longevity - understand IS 710 certification before approving any production drawing.
- Hettich vs Häfele vs Blum Kitchen Hardware - 2026 Price and Cycle Rating - The hardware installed at Stage 4 (boring and routing) determines whether your drawers and hinges still work smoothly in Year 15.
- Modular Kitchen Cost in Gurgaon 2026 - Understanding the 8-stage process puts the ₹1,500 to ₹4,500 per sq ft price range in context - you are paying for CNC, edge banding, QC, and professional installation, not just timber.
- Best Modular Kitchen Manufacturer in Gurgaon 2026: 15-Point Checklist Before You Buy - Useful next reading on hardware planning, costs, materials, or execution.
- Acrylic vs Laminate vs PU Paint vs Veneer: Best Kitchen Finish for Delhi NCR Climate - Useful next reading on hardware planning, costs, materials, or execution.
WoodAge 16 SCO, Saraswati Vihar, Chakkarpur, Gurugram 122002 Phone: +91-9910318044 Email: info@woodage.in Website: woodage.in
Factory visits available by appointment, Monday to Saturday. Last verified: May 2026.