

Replace a Bathroom Vanity Without Unnecessary Tile Damage
Plan a bathroom vanity replacement around existing tiles and plumbing. Identify concealed risks, service access and the work included in the quote.

- Kautuk Sahni
- 9 min read

Quick answer: A bathroom vanity can sometimes be replaced while retaining tiles, basin and plumbing, but only after checking what those components depend on. Survey the old unit, service connections, wall fixing and concealed finishes before ordering. Retaining an unsuitable basin or inaccessible trap can make a supposedly simple replacement more disruptive.
WoodAge is a factory-direct furniture and interiors manufacturer in Gurugram, working since 2003. A retrofit brief should say what remains, what is being replaced and what cannot be confirmed until removal. This planning checklist makes that scope visible before production.
What to check before dismantling
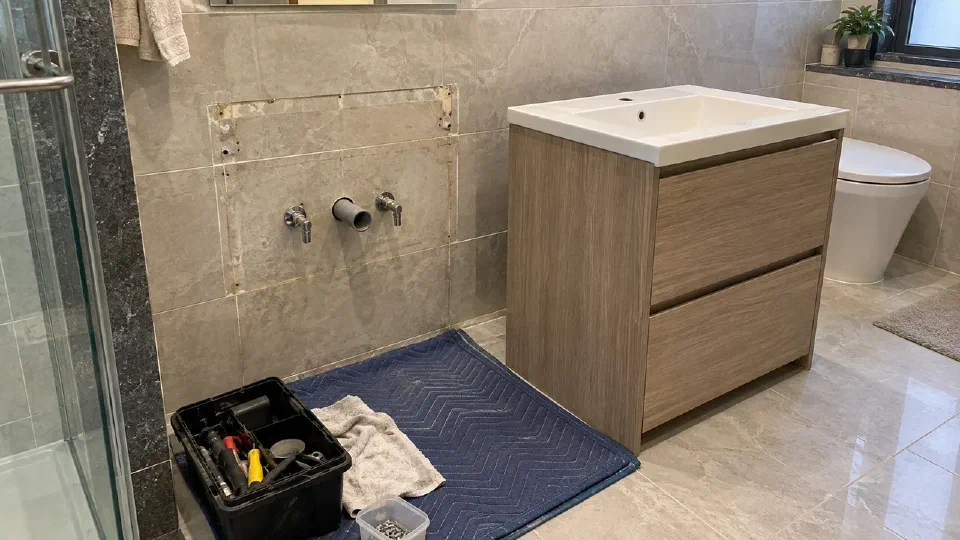
Photograph the vanity from outside and inside. Measure the existing basin rim height from the finished floor: Kohler India’s basin-height guide puts the usual Indian basin height at 800 to 850 mm, so a replacement that changes the counter, basin type or legs can move the rim out of the range the household is used to. Record the basin model if identifiable, tap mounting, waste position, isolation-valve access and wall connections. Check whether floor and wall tiles continue behind the unit. Do not assume a larger replacement can conceal every unfinished area without creating another clearance problem.
| Component | Keep only after checking | Possible extra work |
|---|---|---|
| Basin | Condition, support and fit to the new top | New cut-out or replacement basin |
| Tap | Mounting, reach and compatible connections | New top drilling or plumbing change |
| Trap and waste | Condition, alignment and service access | Repositioning or replacement |
| Wall tiles | Bond, damage and old fixing locations | Local repair or revised footprint |
| Floor finish | Continuity, level and water damage | Making good after removal |
| Existing cabinet fixings | Suitability for the new assembly | A newly assessed fixing arrangement |
For a wall-hung replacement, apply the wall-support assessment separately. IKEA’s bathroom installation guidance reinforces following the particular bathroom furniture’s installation instructions; it does not mean an old fixing can automatically be reused.
Check the basin from below, not only above
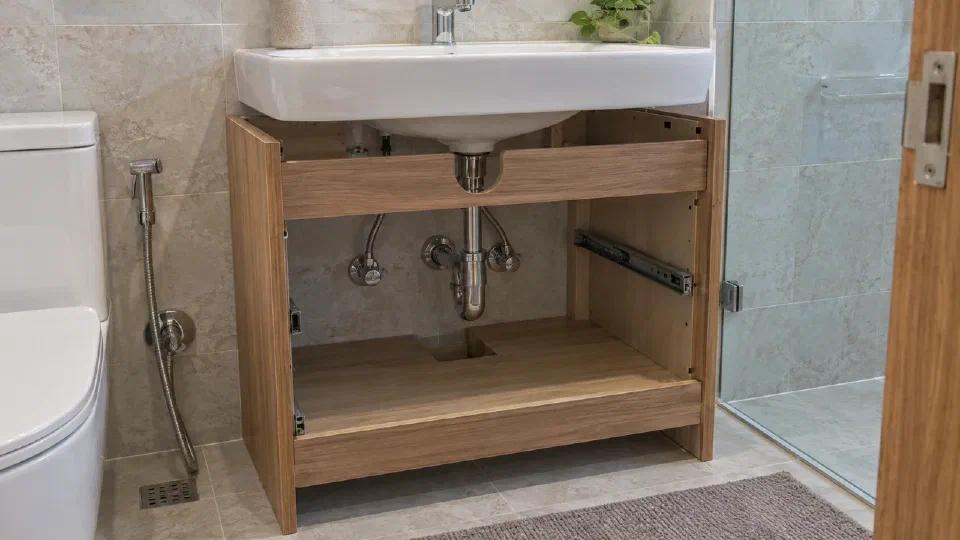
A basin that fits the top in plan can still obstruct a drawer underneath. Record the bowl’s underside, fixing clips, waste and trap as an envelope inside the new cabinet. Include the space needed to undo a connection and remove the trap.
Illustrative fit check: if a drawer has 400 mm of usable front-to-back space and a service envelope occupies its rear 90 mm, the original drawer box cannot simply remain 400 mm deep. The designer must change the drawer, service route or cabinet arrangement. The subtraction leaves a 310 mm space budget in this simplified example, not an approved 310 mm drawer or runner length. Hardware clearances, the drawer back and access for servicing still have to fit. These are example dimensions, not a recommended bathroom detail.
Avoid moving plumbing merely to preserve a preferred drawer layout until the plumber has checked feasibility, access and the effect on waterproofing. A fixed false front or different storage arrangement can sometimes resolve the conflict more sensibly.
Quote the uncertain work honestly
Separate confirmed work from conditional work. A useful quotation identifies removal, disposal, reconnection, new seals, tile making good and what happens if concealed damage is found. Agree who authorises an additional item before work starts.
No inspection can promise zero tile damage where adhesive, hidden brackets or deteriorated finishes are involved. Ask for a careful removal method and an allowance process, not an absolute guarantee. Likewise, a replacement price without plumbing and finishing scope is not comparable with a complete installed quotation.
Make the conditional scope usable: list each surface that may be exposed during removal, the condition that triggers extra work, who records it, who approves the cost and when the installer may restart. For example, an old basin can be marked “retain if undamaged and compatible with the new support” rather than “reuse basin”. The second phrase silently commits the design before the underside and fixing can be inspected.
Sequence the change to reduce downtime
Survey first, confirm the retained components, approve the drawing and arrange the required trades. The responsible plumber should isolate and disconnect services. After removal, inspect the exposed wall and floor before fixing the new unit. Reconnect, test for leaks and verify doors, drawers and service access before acceptance.
The Lowe’s vanity replacement guide and This Old House’s replacement sequence both treat water isolation and plumbing disconnection as part of removal. Use the actual plumber’s site plan for local connections. Record a hold point after the old unit comes out: photograph the tile edges, wall condition, floor continuity and pipe positions, then confirm the final new-cabinet dimensions before drilling. This is the point where the original “retain” decisions can be confirmed or revised.
Do not commit to a fixed completion time until any concealed repair and material lead time are understood. If the bathroom must remain usable, plan an alternative wash point with the household before removal.
Map the footprint that removal will expose
Draw the old and proposed units on the same elevation and floor plan. Mark the outer top, cabinet sides, plinth or legs, splashback and each fixing hole. A wider top may cover an old wall mark while a narrower cabinet below it still exposes an unfinished strip. Changing from a floor-standing unit to a floating one also exposes the floor and lower wall previously hidden by the plinth or cabinet. Inspect that whole area, not just the two side edges.
Illustrative fit check: replacing a centred 900 mm cabinet with a centred 800 mm unit exposes 50 mm on each side of the old footprint. Before ordering, establish whether those strips contain finished tile, adhesive residue or old fixing holes. The arithmetic describes the changed footprint, not the amount of repair your bathroom requires.
Use a short retain-or-replace record: basin and top condition; tap and waste compatibility; isolation valves that can actually be operated; accessible connections; and the wall support required by the new unit. If a basin is bonded to the old top, agree who assesses removal and carries it safely.
After reconnection, ask the plumber to check supply joints and waste connections in normal use, then inspect the cabinet interior for water. Operate every drawer with the services connected. A cabinet that works before the trap is fitted has not yet passed the final storage and access check. Keep valve and trap access clear when putting toiletries back.
Record the numbers the new unit must match
| Measurement | Why it matters |
|---|---|
| Basin rim height from the finished floor | A new counter or vessel basin can raise or lower it |
| Waste outlet position, wall or floor, and its height | The new carcass must keep it inside a service zone, not behind a drawer |
| Supply and isolation-valve heights and side positions | They decide where shelves and drawer runners can go |
| Old fixing holes and bracket marks, to the nearest 10 mm | A narrower new unit can expose them |
| Wall type at each new fixing position | The new unit may need a different fixing from the old one |
India’s code of practice for selecting and installing sanitary appliances is IS 2064, a BIS standard; the plumber should confirm connection details against it and the basin maker’s instructions. If the replacement adds a mirror light, socket or sensor, the circuit becomes electrical work in a bathroom, which India’s wiring code IS 732:2019 treats as a special location; involve a qualified electrician before the new unit is fixed.
Evidence and Verification Notes
The basin-height range is quoted from Kohler India’s published guide, checked in September 2026, as a common Indian reference rather than a requirement. IS 2064 and IS 732 were checked by title. Footprint and fit examples in this guide are illustrative arithmetic. In a Gurugram society flat, whether in a Sector 50 tower or on Sohna Road, check the society’s fit-out rules for plumbing work, noise hours and debris removal before the old unit comes out. Carcass materials for a replacement are compared in the custom bathroom vanity guide, and service points in the kitchen plumbing points guide, which applies the same before-cabinets logic. A WoodAge factory visit shows how service cut-outs are planned in a carcass.
Frequently Asked Questions
Can the existing countertop always be reused?
No. It may be bonded, fragile, incorrectly sized or dependent on the old cabinet’s support. Have the fabricator inspect removal and reinstallation feasibility before treating it as a retained item.
Do I need a plumber for a vanity replacement?
Where supply or waste connections are disturbed, arrange competent plumbing work and testing. Cabinet installation does not establish that those connections are watertight.
Should I order the new vanity before removing the old one?
Only when the survey resolves the critical dimensions and retained interfaces. If essential conditions remain concealed, a staged survey or provisional design is preferable to manufacturing from assumptions.
Can a contractor guarantee that no tile will break?
Not where concealed adhesive, brackets, weak tiles or deteriorated backgrounds are unknown. Ask for a careful removal method, a post-removal hold point and a pre-agreed process for conditional work.
How should uncertain retrofit work appear in the quote?
List the condition that triggers the work, who records it, how approval is obtained and when installation may restart. Keep confirmed work separate from provisional allowances.
How can bathroom downtime be reduced?
Survey and approve the replacement before disconnection, prepare the required trades and materials, and inspect immediately after removal. Do not promise a fixed completion time until concealed conditions are known.
What is the standard height of a wash basin in India?
Kohler India’s guide puts the usual basin height at 800 to 850 mm from the finished floor to the rim. Treat it as a starting point: users’ height, a vessel basin sitting on the counter, and the cabinet’s legs or wall mounting all change the result. Measure the existing rim before ordering a replacement.
For a project in Gurugram or Delhi NCR, use WoodAge’s custom furniture service to discuss the measured requirement and written scope. Product suitability and the final BOQ must be confirmed for the actual order.
Related Guides From WoodAge
- Bathroom vanity guide - for cabinet material and plumbing interfaces.
- Sanitaryware brand comparison - for basin and tap product compatibility.
- Ground-floor moisture checks - for investigating water exposure before fitting cabinets.
- Interior handover snag list - for recording operation and finish defects.
- Grass vs Ebco vs Godrej Kitchen Hardware in India - Useful next reading on budget planning, costs, materials, or execution.
- Gurgaon Modular Kitchen Brand Claims: 10-Year Warranty, Lifetime Warranty, Factory Direct and No Hidden Cost — What They Really Mean - Useful next reading on budget planning, costs, materials, or execution.